Thursday, July 29, 2010

Yellow Nursing Top

A few months ago I bought some yellow jersey material from an op shop. It was a very pretty yellow, just my colour. I make it a policy to snap up knit fabrics if I see them in opshops as knits are quite pricey compared to wovens. I wasn't sure what I wanted to do with it then, but a few days ago I thought that I should start drafting patterns for knits. And I've been wanting a top for nursing-ones that have discreet access for breastfeeding. I came up with this design.


It was to have an empire waistline, a wrap front with bust gathers, and a modesty panel behind with cutouts for nursing (see dotted line and gray shaded area). At first I wanted to make puffed cap sleeves  as in the picture, but when I made my pattern, I forgot and just make short set in sleeves.

I drafted the pattern from scratch using Winifred Aldrich's close fitting jersey bodice block.


I chose the option with greater ease (Aldrich gives you instructions for close fitting with maximum stretch, and another with more ease for less flexible material).


I took some pictures of the drafting and pattern manipulating processes- but stopped halfway because the pictures weren't that good. Here are some of them.

The back and the modesty panel for the front


This is the wrap front-I'm correcting the gape by slashing the neckline and pivoting it

That's all I have of the drafting. I WILL take more organised pictures in the future...

Anyways,  that was a few days ago and I didn't get to put the whole thing together till today. This is how it looks like.

Front View


Back View


That's an awful lot of wrinkles. Methinks I have to do a narrow back adjustment, a swayback adjustment, and a forward shoulder adjustment. Or maybe it's the way I'm standing.

Closeup


Below you'll see how it functions as a nursing top.

Discreet nursing access

Instead of pulling the top up for feeding, this top provides full coverage.

I'm really happy with the way this top turned out-it looks completely store bought. It's not my first time sewing a knit top, but it was the most successful. This was because I used  tricot knit interfacing strips to stabilise the necklines and armholes to keep them from stretching out of shape.

If anybody is interested, I can draft a custom nursing top pattern based on this or make you one. Just email me.

Friday, July 16, 2010

Quick Pencil Skirt

On Monday I bought a 2-metre piece of twill fabric at the opshop for 2 dollars. I knew that it was perfect winter skirt material. I planned to make a Vogue inspired skirt out of it, and after cutting it out, I found that I still had enough left for another skirt. This post will be about that skirt which I knocked up on the fly yesterday.

I wanted a quick pencil skirt with a slit-no zippers or closures-something with a stretch waistband that I can wear whether pregnant or not. I had some black stretch fabric lying around that I had bought from some opshop in some distant past, and some grey lining material that I was given. I quickly measured my waist and my hips-33" and 38". It is depressing to realise  that I'll never be a 24" again.

My plan was to just measure and cut on the cloth without any pattern. I wanted a rectangle of black stretch fabric about 3/4 of my waist measurement for the waistband, about 6 inches high and doubled over for strength and stability as per diagram below.

[caption id="" align="alignnone" width="450" caption="The blueprint"][/caption]

The waistband would go from my natural waist to my hipline, and the twill fabric panels will start from the hip. That way I needn't add darts for the lower panels, since it would fit over the widest part of my hips without any closures. The lower panels are cut simply-my hips were 36+2 inches wearing ease=38", so the front panel was 19" wide with half inch seam allowances, and the back panels 9.5" with seam allowances. The front and back panels taper downwards to 17inches and 8.5 inches in width respectively. The back panels I added about 1.5 inches in width starting from the middle centre back line for a split.

[caption id="" align="alignnone" width="450" caption="The cut pieces"][/caption]

I also cut a lining from the above twill fabric pieces.

[caption id="" align="alignnone" width="450" caption="Cutting into the lining"][/caption]

See Ma! No pins! I was really doing this on the fly. I was more excited about this skirt than the Vogue inspired one now-even though that one is all cut out.

First thing was to overlock all the edges.Most sewing machines have an overcasting stitch if you don't have an overlocker, although if you do plan on sewing garments, you can't beat an overlocker for a professional finish. I love mine.

To make the waistband, join the shortest edges of the two pieces together and form a tube. Use a narrow zigzag stitch, or overlock.

[caption id="" align="alignnone" width="450" caption="Form a tube with the stretch fabric"][/caption]

Fold the tube in half lengthwise, so that you have a double layer going all around your waist.

[caption id="" align="alignnone" width="450" caption="Waistband doubled up"][/caption]

The back slit needs to be done first. I neglected to take pictures-but here's a walkthrough. Sew down the back seam as usual, but at the start of the outside corner, change the stitches to the largest straight stitch. Press open, and sew around the slit. Use a seam ripper and unpick the large stitchs up to the outside corner where the slit starts.

Now it's just the simple matter of joining the two side seams together.

Repeat the whole process with the lining.

Attach the skirt to the waistband-pin at quarterly intervals, and stretch the waistband to fit the skirt as you sew. Use a narrow zigzag stitch. Now attach the lining with the same process, just be sure that the right side of the lining faces the inside. Use a blindhem stitch to hem the skirt and the lining, making sure that the lining is hemmed higher so that you don't see the lining from the outside. Handsew the lining slit to the skirt slit.

[caption id="" align="alignnone" width="301" caption="Quick pencil skirt"][/caption]

[caption id="" align="alignnone" width="301" caption="Back view"][/caption]

Hmm..I didn't do a very good job on the pressing. But I guess it's not wool, since it didn't shrink when I steamed it, and it's not wrinkle resistant.

[caption id="" align="alignnone" width="301" caption="Closeup view"][/caption]

All in all, I'm very pleased with this skirt. It was a very quick job, and I spent only a dollar on the material. It will always fit me, and the pencil skirt is very flattering. It is also great for maternity wear too!

Go home and make one today!

Wednesday, July 14, 2010

Opshop Finds On My Birthday

Yesterday I turned 26. It doesn't feel like another year has passed and that I'm a year older and only four more years away from the big three-O. In my head I still feel like a giddy 18-year-old. We had a quiet celebration with the family on Sunday night. The Wednesday before, Wyld Man and I had a special night out to celebrate both our birthdays-we're both July babies. I got a Mileni bag as a present from the family, as well as a gift card at Suzannegrae.

[caption id="" align="alignnone" width="450" caption="Mileni bag"][/caption]

It's a huge bag-I carried it around yesterday with one of the compartments with my stuff, and the other half with William's stuff-nappy, squirt bottle, a bottle of water, nappy change mat, bib, hanky and a stuffed toy!

Anyways, yesterday morning I caught up with a playgroup mummy and she brought me to her favourite opshop! It's run by the Uniting Church and is quite small, but I still managed to bag quite a haul. I got a few things for myself...

[caption id="" align="alignnone" width="301" caption="Opshop outfit"][/caption]

The tan crossover top was AUD1.75,  and the angora wool skirt was AUD3.  I especially love the skirt, with is a thick stretchy knit, quite warm and perfect for winter outfits. The only thing is that with tights, it tends to ride up unless I make a lining for it, which I shall.

I also got myself a couple of belts for 50cents each-I keep wearing mine out.

I got William a few things-lots of bibs and some little outfits like...

[caption id="" align="alignnone" width="450" caption="Marks and Spencer red striped 2 set"][/caption]

...for AUD3. And a couple of Wondersuits...

[caption id="" align="alignnone" width="450" caption="Wondersuits"][/caption]

...for a dollar each.

I also picked up 2 metres of a lovely winter weight wool twill.

[caption id="" align="alignnone" width="450" caption=" Twill fabric"][/caption]

I'm in the middle of cutting it out for a skirt. I've decided to make another Vogue 8426-inspired skirt.

When I came home later that day, I had this given to me.

[caption id="" align="alignnone" width="450" caption="My Little Wyld Man's card for me"][/caption]

He'd even signed it!

[caption id="" align="alignnone" width="450" caption="Signed by William"][/caption]

Isn't it the cutest little scribble ever?

And this was his and daddy's present to me.

[caption id="" align="alignnone" width="450" caption="365 Day Cookbook"][/caption]

A friend on Facebook reminded me of how blessed I was to have my very own knight and prince.*Sigh*. Happy.

Thursday, July 8, 2010

Custom Fit by Glad Wrap

Disclaimer: This Is Not A Glad Wrap Ad

I had a very productive day today. Did some laundry, some ironing, some tidying...and some gladwrapping. What did I gladwrap? Me. You see, in the sewing world, it is very useful to have dressforms to pin things on because you want to test the fit and hang of a garment. However, dressforms are very expensive, and sewing test garments all the time is rather time-consuming. The answer? Gladwrap yourself. The idea is to wrap yourself up in glad wrap with a few layers, mark the seam lines and darts and centre lines, cut off the wrap, lay it flat , and then use that as YOUR pattern for making garments to your measurements. So much faster. So that was what I've been up to today. I made a friend online who does patternmaking at TAFE, and we made a date to gladwrap ourselves today. So Mandy came over and we set to work. I came across this idea here.

Here's a walkthrough: You need Gladwrap or any sort of clingwrap, a tight t-shirt, a permanent marker pen, scissors, brown tape, string and a patient friend.

First you need to tape the waistline


I tied some string around my natural waist and used packing tape on it.

Then you need to mark the centre front line with tape.

Sorry for the fuzzy picture. The centre front needs to be marked with tape. Same with the back.


Start wrapping around the whole body down to the hip and over the neck and shoulders till you get this.


Mark the bust points, the centre front and back lines...


Ignore the diamond shape lines on the back-they are supposed to be straight lines from the shoulder blades down to about 5 inches below the hipline.

Mark the shoulder seams, the neckline, the side seams and the armhole. Tape all of the above.

Mark the darts from the bustpoints straight down to about 5 inches below the hipline.


I'm feeling like I'm in a funky disco costume. But I can't dance coz it's too tight.


Now we're ready to get out of this ...thing...

Cut down the centre front line. Or the back. Up to you.


Cut down the centre front line-or the back centre line. Doesn't really matter.

And voila!

Meet Headless Mini Me!!!


That's an exact replica of my body shape which I will cut up into flat pieces to make body fitting dress patterns.

Here is the thing sawn in half.


To make the patterns, the body wrap form must be cut into flat pieces. Cut along the waistline, the neck line, the shoulder and the side seams and you will get this.

These are the upper bodice and lower bodice pieces, left and right sides.


Now I will proceed to slash the darts-this makes the pieces flat. If there is still some 3-D shape to the wrap, you will need to add more darts, or deepen the dart slash to flattern it. We found that because there was so  many layers of wrap, it was a little hard to ascertain that the pattern lay completely flat.


The darts that were drawn in as straightlines at the back and the front has to be slashed open till the pattern lies flat like the above picture. Then lay in on a wide piece of paper and trace around. This is what you'll get.

Voila! Your personal block!


Bear in mind that you can't make a dress with the pattern here-it has no seam allowance, no ease. You can't really move or breathe in this, unless it was a stretch material.

We actually made two wraps, and the one shown here is the first one. The first one had more layers on it, and therefore more stable and didn't warp afterwards. The second one we didn't use as many layers, so it's starting to come apart-the gladwrap wasn't as sticky as we'd thought it'd be. So if anyone attempts it, wrap at least 10 layers evenly all over the body.

I'm actually a little puzzled as to how the skirt block turned out. The front dart hardly opens, and the back dart looks odd. Also, I didn't expect the armhole to look so....angular. Hmm. Well I'll need to grade it up one size and make up a test garment to see how it'll look. Stay tuned!

Tuesday, July 6, 2010

Homemade Curry Pizza

As a child and into my teens, I had loved pizza. Going to Pizza Hut in Malaysia was always a treat, and not one that happened very often. When I came here, Wyld Man and I sometimes ordered pizza from Domino's and Pizza Hut, and sometimes we were fortunate enough to be at his mum's while she was making pizza and we'd get invited to stay for dinner. However, ordering takeaway pizza, with extra toppings like jalapeno peppers (Wyld Man introduced me to its delicious heat and I've never looked back) for two people can get expensive pretty quickly, even with coupons. Wyld Man and I figured out that for the $4 extra we pay to add jalapenos on both of our pizzas it was cheaper to buy a jar at the store and put in on ourselves. And then I took the next step. I started making my own for a lot less, and I get to put whatever I want on it, however much I want. And it tastes better too! So I've been making pizzas for at least 5 Saturdays now.

The other night the boys had a gamer's night and I made three pizzas to go around.I used a store-bought base, with canned herbed diced tomatoes, italian herb mix, and a secret ingredient. Curry powder. I had initially started with a basic tomato sauce base, but then there was one time that I was daring and thought I'd just throw some curry mix I had on hand on to the base. Wyld Man raved about it and now every pizza I make has curry in it.

This is what I used.

[caption id="" align="alignnone" width="450" caption="Ingredients"]
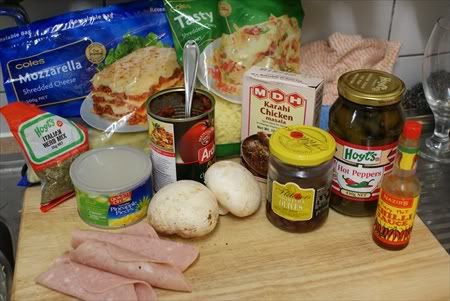
[/caption]

  • Cup Mushrooms

  • Diced canned tomatoes

  • Canned pinaepple pieces

  • Olives

  • Pickled hot peppers

  • Curry Powder

  • Italian herbs

  • Ham

  • Tabasco Sauce (I used Nzir chili sauce to substitute)

  • Grated cheddar and mozarella cheese and a store-bought pizza base


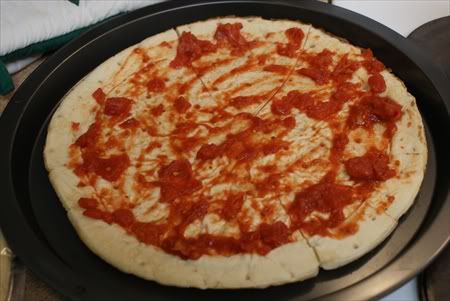
[caption id="" align="alignnone" width="450" caption="Ready made pizza base"]
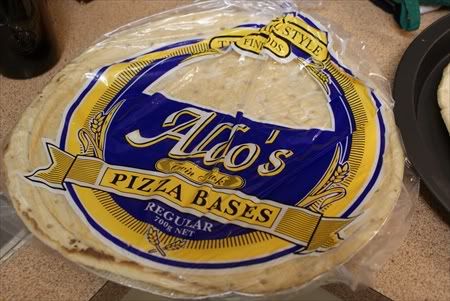
[/caption]

I'm too lazy to roll dough-but I should. It's cheaper. And would probably taste better too, once I get the hang of it.

First step, the diced tomatoes goes on.

[caption id="" align="alignnone" width="450" caption="Ardmona Rich and Thick Chopped Tomatoes with Mixed Herbs"]
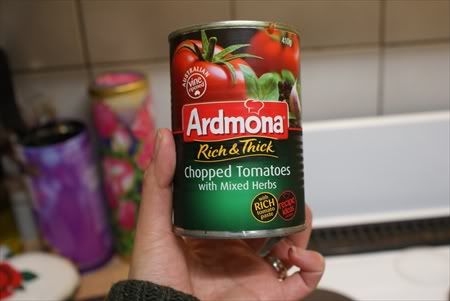
[/caption]

In a pinch, you can use any canned tomatoes. But nothing too watery though. Spread about 2 heaping tablespoons onto the base.

[caption id="" align="alignnone" width="450" caption="Tomato spread"][/caption]

I usually score the pizza base into 6 segments because cutting a baked pizza without a pizza cutter can get frustrating. Pre-scoring the base saves me some headache. Oops- need to preheat the oven first. 200 degrees Celsius.

Next comes the Italian Mixed Herbs. Give a very generous sprinkle.

[caption id="" align="alignnone" width="450" caption="Big dash of herbs"]
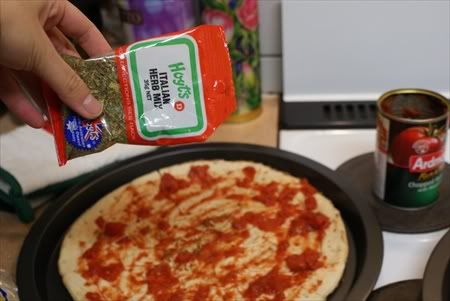
[/caption]

Then, the curry. I had this on hand.

[caption id="" align="alignnone" width="450" caption="Karachi Chicken Masala"]
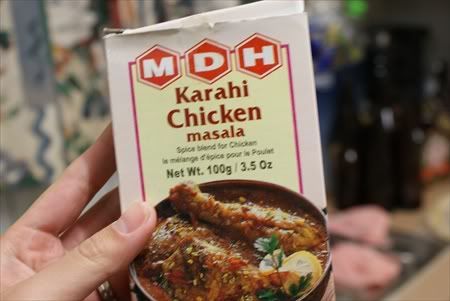
[/caption]

Substitute with whatever curry spice you have on hand.

[caption id="" align="alignnone" width="450" caption="Be very, very generous."]
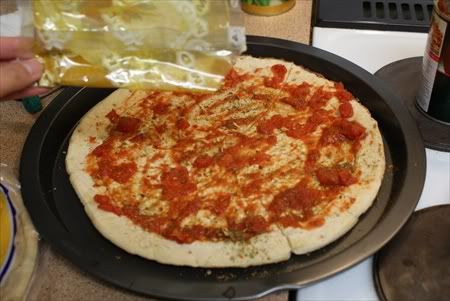
[/caption]

Sprinkle on some cheese at this point. When it melts, it will hold on to the toppings above. Otherwise, you'll find the toppings slipping off.

[caption id="" align="alignnone" width="450" caption="Slight sprinkle of cheese"]
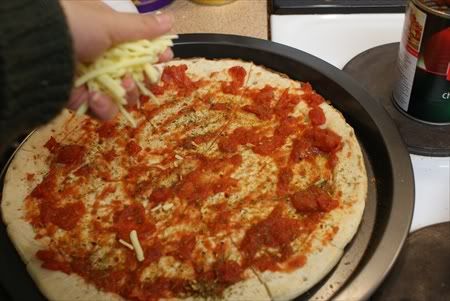
[/caption]

If I had tabasco sauce, I would put in at this point. But I only had Nazir's.

[caption id="" align="alignnone" width="450" caption="Nazir's Chili Sauce"]
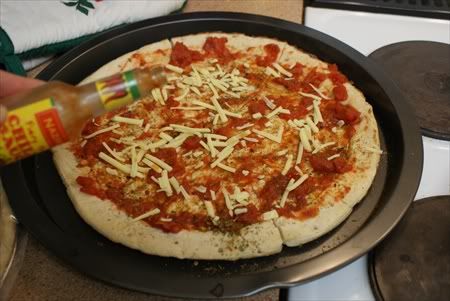
[/caption]

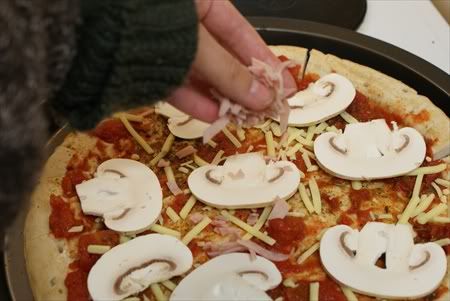
Slice some mushrooms..

[caption id="" align="alignnone" width="450" caption="Sliced cup mushrooms"]
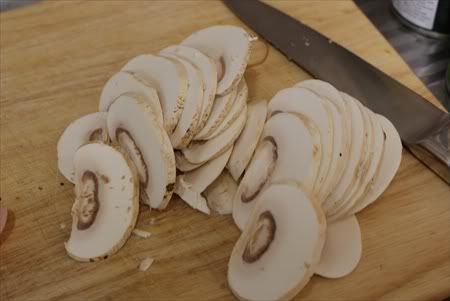
[/caption]

...and some ham...

[caption id="" align="alignnone" width="450" caption="Sliced ham"]
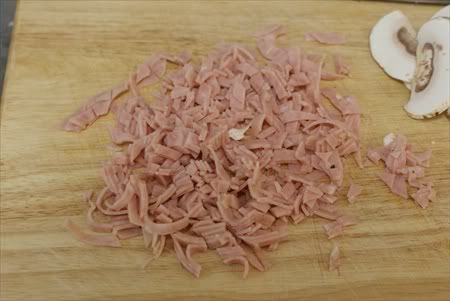
[/caption]

...and sprinkle on the pizza...like this...

[caption id="" align="alignnone" width="450" caption="Attack of the Giant Mushrooms"][/caption]

Next, some olives to fill in the gaps.

[caption id="" align="alignnone" width="450" caption="Getting there..."]
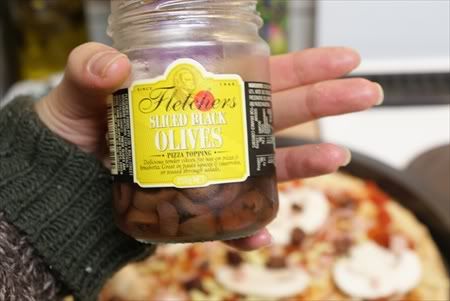
[/caption]

There are olives, and there are olives. I bought homebrand once, and they were completely tasteless. These are so much better.

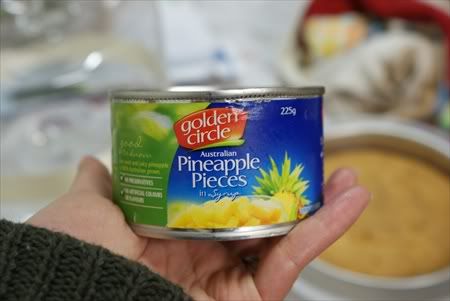
And then comes the pineapple.

[caption id="" align="alignnone" width="450" caption="Golden Circle Pineapple pieces"][/caption]

Pizza is never complete without some hot stuff. I usually use jalapeno peppers, but ran out. So I used...

[caption id="" align="alignnone" width="450" caption="Hoyts Hot Peppers"]
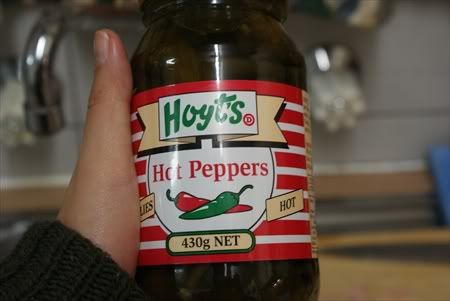
[/caption]

...instead. They are huge...

[caption id="" align="alignnone" width="450" caption="Big bad peppers"][/caption]

..so we do the chop chop...

[caption id="" align="alignnone" width="450" caption="Chopped wimpy peppers"]
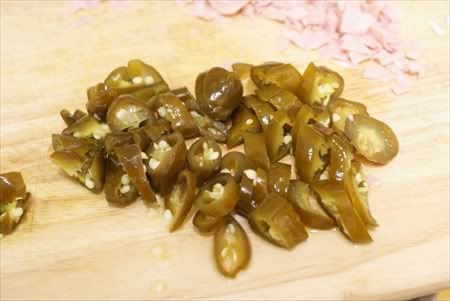
[/caption]

Sprinkle randomly on pizza...

[caption id="" align="alignnone" width="450" caption="Pizza coming along nicely"]
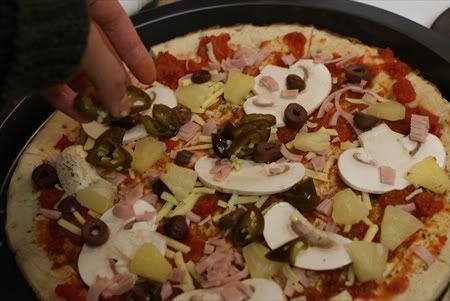
[/caption]

Big dollop of mozarella and cheddar...

[caption id="" align="alignnone" width="450" caption="Cheese cheese"]
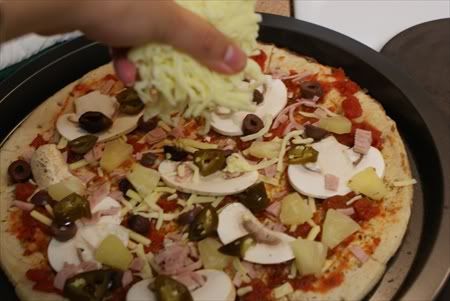
[/caption]

One last sprinkle of Italian herbs and curry powder...

[caption id="" align="alignnone" width="450" caption="And into the oven we go!"]
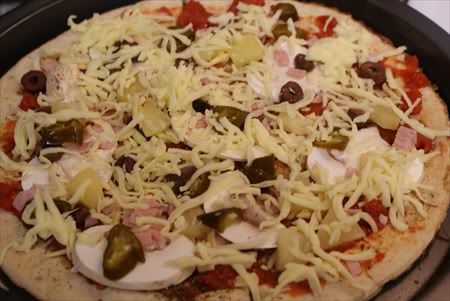
[/caption]

Lower oven temp to 180 degrees Celsius, set timer for 15 minutes. If you have a temperamental electric oven like me, and are using two trays at different levels, switch the trays after 15 minutes and leave for another 10 minutes.

[caption id="" align="alignnone" width="450" caption="The perfect homemade junk food."]
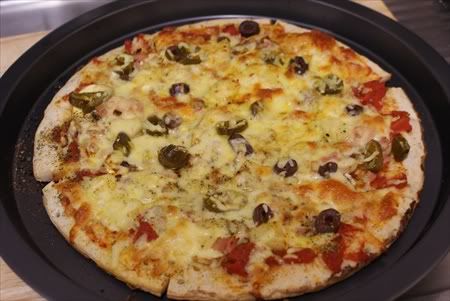
[/caption]

Seriously yummy. Can't wait for Saturday!